Quick answer for Middle Tennessee: check interior stains on ceilings and walls, trace attic moisture uphill along sheathing and nail lines, clear gutters and eaves of debris or ice, inspect flashing at chimneys, skylights, and sidewalls, look for lifted or missing shingles, and examine roof vents and pipe boots for cracks.
Quick Answer: Middle Tennessee Roof Leak Checklist
- Document new ceiling stains; protect belongings.
- Check attic sheathing and nails for fresh moisture.
- Confirm gutters, downspouts, and eaves are clear.
- Inspect chimney, skylight, and sidewall flashing.
- Look for lifted, creased, or missing shingles.
- Examine ridge vents, box vents, and pipe boots.
- Trace leaks uphill; photograph the source.
- Stabilize indoors; call a pro if water is active.
A simple analogy
Your roof is a layered raincoat in a crosswind: shingles are the fabric, underlayment the liner, and flashing the zippers and seams. When wind-driven rain hits, water probes any gap—stiff, cold materials and tired sealant make those seams the likeliest entry points.
Why Cold Fronts Trigger Roof Leaks in Middle Tennessee
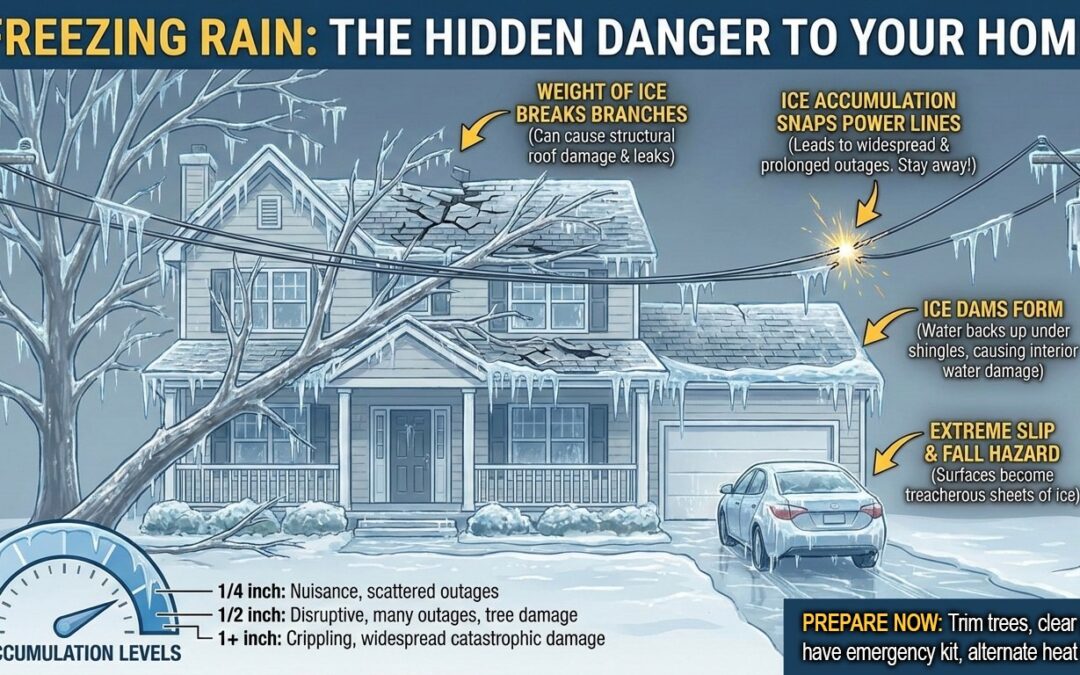
Cold fronts in our region swing temperatures rapidly, intensifying freeze–thaw cycles that stress roofing materials. Asphalt shingles contract in the cold and relax as temperatures rebound; aged adhesive strips can lose grip, allowing wind uplift on shingle tabs. Strong gusts push lateral rain beneath laps and through imperfect baffles at the ridge vent. Flashing sealants hardened by years of sun then brittle in the cold, cracking at chimneys, skylights, and sidewalls just when wind-driven rain arrives. Small ice ridges at the eaves can form an ice dam that forces meltwater back under the first courses of shingles; see the IBHS ice dam prevention guidance for how attic heat loss and inadequate air sealing drive this problem.
Middle Tennessee is also seeing more heavy downpours that magnify these vulnerabilities. Recent analyses highlight heavy rainfall trends in the Southeast, which raise the odds of wind-driven rain reaching weak seams, nails, and fasteners. Frontal passages commonly bring post-front northwesterly winds, a setup that punishes west and southwest roof slopes; the NWS Nashville forecast office frequently notes these wind shifts in event briefings.
Local context across Nashville, Franklin, Murfreesboro, and Clarksville
Neighborhoods like Sylvan Park, East Nashville, Bellevue, and Green Hills often feature architectural asphalt shingles, while Franklin’s Cool Springs and Fieldstone Farms include both 3-tab and architectural profiles. Murfreesboro’s Blackman area and Clarksville’s Sango and St. Bethlehem mix newer architectural asphalt with pockets of standing seam metal. Architectural shingles resist wind uplift better than older 3-tab, but aged pipe boots and flashing remain common leak points. Standing seam sheds snow and ice quickly yet demands perfectly detailed penetrations. In many 1990s–2000s subdivisions, 3-tab roofs are approaching or past typical 20–25 year service lives, increasing risk after fronts. Newer 2010s builds with architectural shingles fare better in wind, while 1970s–1980s neighborhoods may have a patchwork of repairs and older flashing that merit close inspection first.
Step-by-Step Roof Leak Diagnosis
Before you go on the roof
- Use ladder safety: set a 4:1 angle, tie off when possible, and maintain three points of contact.
- Wear proper footwear: clean, soft-soled shoes with good grip; avoid sandals or worn treads.
- Respect weather and ice: never climb on wet, icy, or windy roofs; wait for dry, calm conditions.
- Know when to stop: if water is active, slopes are steep, or ice is present, call a professional.
Tools you’ll need
- Flashlight or headlamp, gloves, and a respirator or mask for dusty attics.
- Binoculars for ground-level scans and a camera/phone for documentation.
- Contractor bags, plastic sheeting, and a utility knife for quick protection.
- Optional: a moisture meter to verify wet substrates.
Interior rooms
- Check ceilings below roof valleys, chimneys, or skylights for rings, discoloration, or bubbling paint.
- Inspect exterior walls and baseboards for streaking or dampness; water can travel along framing.
- If you suspect water near electrical fixtures, shut off power to the circuit and avoid use.
Attic inspection
- Walk only on joists or decking; wear protective gear and bring a bright light.
- Trace moisture uphill from stains; roof leaks usually enter above the visible spot.
- Check sheathing and nail tips for frost, rust, or fresh drip marks.
- Look for daylight at the ridge and along penetrations that may indicate gaps.
- Verify clear soffit baffles and a continuous path to the ridge vent or box vents.
- Inspect vapor barrier continuity above bathrooms and kitchens to limit warm, moist air reaching the attic.
- Confirm bath fan ducts are insulated and terminate outdoors, not into the attic.
- Run bath fans and perform a quick tissue test at connections to detect air leaks while operating.
Condensation or leak? A quick diagnostic
After a hard freeze, lay paper towels beneath several nail lines in the attic and leave them overnight. If drips begin as the morning sun warms the roof—without new precipitation—you may be seeing condensation melting off cold nail tips and sheathing. If dripping correlates with rain or wind-driven rain events regardless of temperature, suspect a true penetration at shingles, flashing, or vents. Improve ventilation and air sealing for condensation; repair roofing components for leaks.
Ground-level exterior scan
- Walk the perimeter with binoculars. Note missing shingles, lifted tabs, creases, or exposed nails.
- Confirm gutters and downspouts are clear; look for overflow marks at fascia and eaves.
- Check for shingle granules at downspout outlets indicating wear or hail impacts.
Roof edges and valleys
- At eaves, verify a properly lapped drip edge; water curling behind gutters can enter the soffit.
- In valleys, look for cracked shingles, open seams in valley metal, or debris that diverts water sideways.
Critical flashing points
- Chimneys: step flashing must tuck under shingles, with counterflashing sealed into mortar joints.
- Sidewalls: inspect step flashing where the roof meets siding; corrosion or lifted pieces are common leak sources.
- Skylights: check head flashing and weep holes; sun-aged gaskets can admit wind-driven rain.
- Plumbing penetrations: cracked pipe boots split further in cold snaps; replace aging rubber collars.
For layering and detail standards, see the NRCA roof flashing basics. For complex or recurring issues, schedule professional flashing repair in Tennessee to ensure a lasting fix.
What not to do
- Do not apply heat to an ice dam; you can damage shingles and create fire risk.
- Do not walk on icy shingles; wait for dry, ice-free conditions.
- Do not seal attic vents shut; you’ll worsen condensation and moisture issues.
- Do not vent bath fans into the attic; always duct outdoors.
Common Post–Cold Front Leak Sources in Tennessee
These are the most frequent culprits after a front. If you spot these, revisit the Quick Answer checklist to prioritize action and mitigate damage quickly.
- Wind-driven rain entering under lifted shingles or through imperfect ridge vent baffles.
- Small ice dam ridges at eaves backing water under the starter course during freeze–thaw cycles.
- Aged or cracked pipe boots and brittle sealant at chimneys, skylights, and sidewalls.
- Attic condensation dripping from cold nail tips after a deep freeze and rapid warm-up.
- Improperly terminated bath fan ducts saturating insulation and sheathing.
Cross-reference these with the roof inspection checklist above to prioritize your next steps.
Real-world example
After an overnight cold front with brisk northwest winds, a West Nashville homeowner noticed a coffee-colored ceiling stain near a bathroom the next morning. In the attic, they traced moisture to a cracked EPDM pipe boot collar where wind-driven rain had entered along the penetration. They placed towels, set a bucket beneath the drip, taped plastic sheeting to protect drywall, and ran box fans with a dehumidifier. A licensed roofer completed a same-day dry-in and replaced the pipe boot, checked nearby shingles for creases, and confirmed the ridge vent and flashing were sound. No further leaks occurred in subsequent storms, and the ceiling dried within 48 hours.
DIY vs. Professional: When to Call for Emergency Roof Repair
- Call immediately if water is active, slopes are steep, or ice is present; safety first.
- DIY tasks: indoor mitigation, documenting damage, and clearing downspouts from the ground.
- Pros handle temporary dry-in, detailed diagnostics, and permanent flashing or shingle repairs.
- For fast help, explore emergency roof repair in Nashville and nearby areas.
Temporary Triage: Stop Interior Damage Fast
- Protect electrical: switch off power to wet fixtures and avoid outlets until inspected.
- Move valuables and electronics; cover furniture with plastic sheeting.
- Create a controlled drain path for ceiling blisters: pierce a pinhole at the lowest point into a bucket.
- Run box fans plus a dehumidifier for 24–48 hours to dry surfaces and air.
- Bag and remove wet insulation that has lost loft; saturated batts lose R-value and can support mold.
- Ventilate by slightly opening interior doors; keep HVAC running to circulate air.
- Document with wide shots and close-ups; keep receipts for any mitigation supplies.
Do not tape or seal gas appliance flues or modify venting—venting changes should only be made by licensed specialists. Mold remediation, gas venting changes, or electrical issues should be handled by qualified, licensed professionals, not DIY.
Emergency tarping (safety-first)
- For steep, high, or icy roofs, call insured professionals for temporary tarping.
- Overlap the ridge by 2–3 feet and secure wood strips along edges and at the ridge to reduce wind lift.
- Use wood strips (battens) to secure tarps at edges and ridges; avoid nailing through shingles without backing.
- Never climb ladders in gusty winds; wait for calmer conditions and daylight.
Prevention: Upgrades That Pay Off Before the Next Front
- Air sealing and insulation: target R-38 to R-49; seal top plates, can lights, and chases to reduce heat loss and ice dam risk.
- Balanced ventilation: maintain clear soffits with a continuous ridge vent or adequate box vents; avoid short-circuiting airflow.
- Underlayment: place self-adhered ice and water shield in valleys, at eaves, and around penetrations—even in Tennessee it’s a smart defense against wind-driven rain.
- Drip edge and kick-out flashing: modern codes typically require these; confirm local Tennessee and municipal amendments with your contractor.
- Shingle and fastener upgrades: Class 3/4 impact-rated shingles and enhanced nailing patterns improve wind performance.
- Gutter maintenance: clean late fall and spring; extend downspouts away from the foundation.
- Vent bath and kitchen fans outdoors; insulate ducts to prevent condensation.
Balanced ventilation should be sized by net free area (NFA), split roughly 50/50 intake to exhaust; contractors should verify required NFA per local code and manufacturer specifications. For added water protection, self-adhered ice and water shield performs best where water concentrates: along valleys, at eaves above heated spaces, and around chimneys, skylights, and plumbing penetrations. Overlap per manufacturer guidance and extend up the roof far enough to reach the warm side of the eave. Always confirm placement and coverage against current Tennessee codes and local municipal amendments. Explore related guidance like ice dam prevention in Tennessee and a detailed roof inspection checklist to prepare ahead of the next front.
Costs: Typical Middle Tennessee Ranges
- Emergency dry-in or tarp: $350–$1,200 depending on size and height.
- Pipe boot or small flashing repair: $200–$600.
- Skylight reseal or curb flashing: $350–$900.
- Chimney flashing and counterflashing with minor masonry repointing: $700–$1,800.
- Valley rework or partial slope repair: $800–$2,500.
- Ridge vent replacement: $15–$30 per linear foot.
- Attic air sealing plus insulation top-off (typical attics): $1,500–$4,000.
- Full asphalt shingle replacement (1,800–2,400 sq ft home): $9,000–$18,000+ based on shingle class and decking condition.
Prices vary with pitch and height, the number of existing shingle layers, any decking rot discovered, site access, material class, and code-required upgrades. Steeper roofs, multi-story access, and complex flashing details add labor time and safety measures. Material choices—from basic three-tab to Class 4 impact-rated shingles—also influence cost. Estimates may vary by municipality due to local code amendments and inspection requirements; confirm scope and code items in writing.
Note: Local codes apply and change; contractors should verify the latest Tennessee and municipal amendments when quoting drip edge, kick-out flashing, ventilation, and underlayment requirements.
Insurance and Documentation Tips for Tennessee Homeowners
- Time-stamp photos during and after mitigation; include both wide shots and close-ups.
- Keep receipts for emergency services, drying equipment, and materials.
- Photograph receipts and your mitigation setup (fans, dehumidifiers) for your claim file.
- Request a written inspection with photos noting wind direction and the event date.
- Avoid permanent repairs until the adjuster documents damage, unless needed to prevent further loss.
- Ask about ordinance-and-law coverage for code-required upgrades like drip edge or ventilation.
Featured Problem Areas After a Cold Front
Focus here if your home shows signs of water entry after a front. If you spot these, revisit the Quick Answer checklist to prioritize action.
Ice dams (sometimes in Tennessee)
Even small ice ridges at eaves can back water under shingles when attic heat melts snow and refreezes at overhangs. See the IBHS ice dam prevention guidance for air sealing, insulation, and underlayment strategies.
Wind-driven rain under shingles and vents
Post-front northwesterly winds can push rain laterally into shingle laps and through ridge vent baffles, especially on west and southwest slopes noted by the NWS Nashville forecast office. Enhanced nailing, newer ridge vents, and intact seal strips reduce risk.
Flashing failures
Temperature swings fatigue sealants. Proper layering at step flashing, counterflashing, and skylight head flashing is essential; review the NRCA roof flashing basics for correct sequencing.
Attic condensation masquerading as a leak
During a deep freeze, attic condensation in Tennessee occurs when moist indoor air condenses on cold sheathing and nails. When temperatures jump, that frost melts and drips along nail lines—an “inside-out leak” that calls for better air sealing and ventilation.
What not to ignore
- Active dripping during storms or new stains after rain.
- Sagging ceilings or bulging drywall.
- Arcing, buzzing, or tripping breakers near wet fixtures.
- Musty odors 48 hours after you believe areas are dry.
Seasonal Maintenance Calendar
- Late fall: clean gutters and valleys; inspect pipe boots, ridge vent, and flashing before winter fronts.
- Mid-winter: after cold snaps, check the attic for frost on nail tips and underside of sheathing.
- Early spring: scan shingles and flashing after storms; clear debris that collects in valleys.
- Summer: tune up attic ventilation and insulation; verify bath and kitchen fans vent outdoors.
Future Outlook: What to Expect in Middle Tennessee Winters
Expect more variability—fast swing cold outbreaks paired with stronger frontal rain bands. The Southeast is projected to see more days with 2-inch-plus rainfall, increasing the chance that wind-driven rain exploits small flashing gaps and tired shingle seals. Regional assessments document rising precipitation extremes; see heavy rainfall trends in the Southeast and the Southeast climate risks in the National Climate Assessment. This outlook favors resilient assemblies: modern self-adhered underlayments in valleys and eaves, properly lapped drip edge, and continuous ridge-to-soffit ventilation paired with aggressive attic air sealing.
For homeowners, the forecast translates to practical upgrades and maintenance. Add ice and water shield where it matters most, rework aging flashing details, and improve insulation and air sealing to mitigate ice dam potential and attic condensation. These measures reduce the odds of a leaking roof after a cold front, keep energy bills in check, and improve overall durability as weather swings continue.
FAQ: Cold Front Roof Leaks in Tennessee
Will the leak stop when temperatures rise?
If condensation is the cause, warmer air may temporarily stop dripping, but moisture will return unless ventilation and air sealing improve. If flashing or shingles are compromised, the next rain will likely leak again.
How fast can mold form after a leak?
Mold can begin within 24–48 hours on porous materials. Dry the area quickly with airflow and dehumidification; consider professional drying if insulation or framing is saturated.
Do I need a full replacement for a single leak?
Not always. Localized flashing or pipe boot repairs often solve isolated leaks. If shingles show widespread granule loss, curling, or cracking, replacement with modern underlayments and ventilation may be more cost-effective.
Can I claim wind-driven rain on insurance?
Often yes when damage is sudden and accidental (e.g., wind-lifted shingles), but not for deferred maintenance. Document wind speeds, the event date, and conditions, and consult your policy and adjuster.
How long should I run dehumidifiers after a roof leak?
Run box fans plus a dehumidifier continuously for 24–48 hours, then reassess with a moisture meter if available. Materials must be dry to the touch and at target moisture content before closing cavities or repainting.
Should I use stain-blocking paint before the area is fully dry?
No. Wait until surfaces are 100% dry and verified with a moisture meter if possible. Prime with a stain blocker only after proper drying and cleaning to avoid trapping moisture.
What photos help insurance approve a roof leak claim?
Capture wide shots of the room and roof slope, close-ups with a measuring tape for scale, and timestamped images. Including today’s newspaper or a smartphone timestamp in frame can help verify timing.
Local help when you need it
If you’re dealing with a Middle Tennessee roof leak after a cold front, we can arrange same-day tarping and next-day inspections in Nashville, Franklin, Murfreesboro, and Clarksville. Our team provides free photo documentation to support insurance claims and clear repair plans prioritizing safety and code compliance. For rapid assistance, see emergency roof repair in Nashville or request a roof inspection checklist to prepare for the adjuster’s visit.