On this page: Quick Answer | How Cold Weather Damages Roofs | Regional Considerations | Detailed Signs | Tools for Checks | What to Do Next | When to Call a Pro | Insurance Tips | Prevention | Analogy | Future Outlook | FAQs | DIY vs. Pro | Costs & Timelines | Accessibility & UX | Key Takeaway | Sources
Quick Answer: Top Signs at a Glance
After a winter storm, confirm these winter roof damage signs first. Use binoculars and stay off icy surfaces.
- Ceiling stains: New water rings or damp spots on top floors or in the attic.
- Ice dams: Icicle chains and ice ridges at eaves that cause ice dam roof leaks.
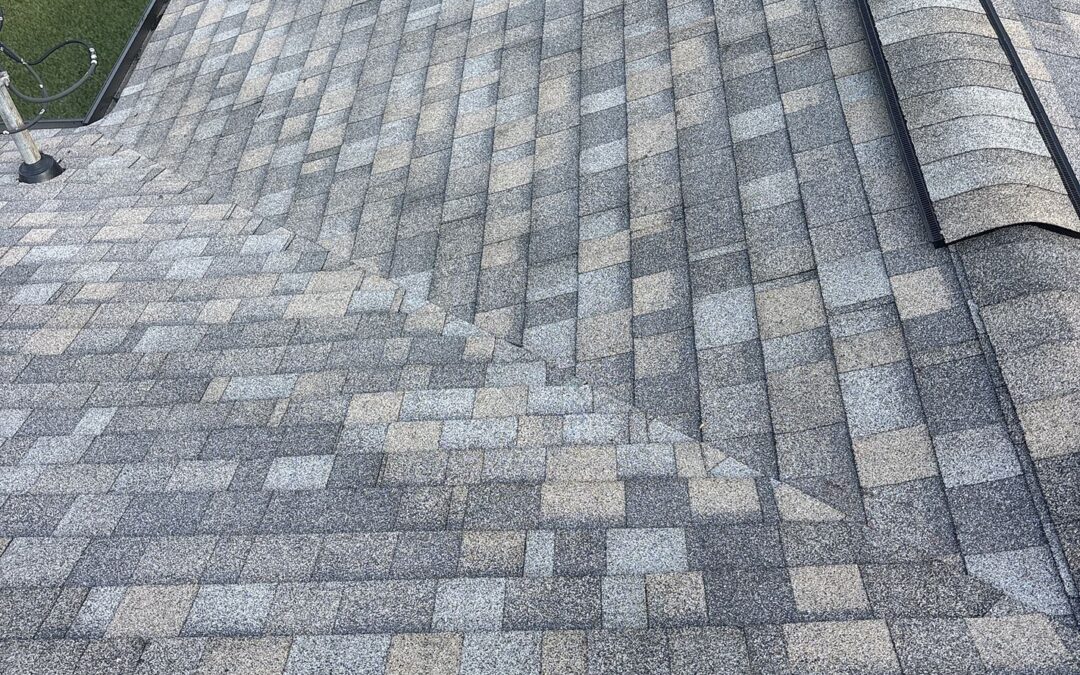
- Shingle damage: Missing, cracked, curled, or lifted tabs and exposed nails.
- Gutter problems: Bent, loose, or ice-loaded gutters and downspouts.
- Flashing gaps: Rusted, shifted, or unsealed flashing at chimneys, skylights, and vents.
- Granule piles: Excess granules in gutters or at downspout discharge points.
- Structural stress: Sagging ridges or decking and interior doors suddenly sticking.
- Attic moisture: Frost on nails, damp insulation, or musty odors.
- Impact marks: Hail damage on roof surfaces and dents on soft metals.
- Flat-roof issues: Standing water, blisters, or open seams on low-slope membranes.
How Cold Weather Damages Roofs
Cold weather punishes roofing systems through a few predictable mechanisms. Understanding each helps you target a safer, faster post-storm roof inspection.
- Freeze-thaw cycling: Water seeps into tiny gaps, freezes, and expands, then contracts when it melts. Over time, this widens cracks in shingles, flashing, and sealants, much like potholes form in winter roads. Inspect eaves, valleys, and penetrations after sudden thaws and slush refreeze.
- Ice dams: Heat escaping from living spaces melts rooftop snow, which refreezes over colder eaves. The resulting dam forces water under shingles and into the roof deck and attic. Watch for wind-driven snow collecting behind dormers and along north-facing eaves where sunlight is limited.
- Wind uplift: Gusts lift shingle edges and stress fasteners, especially on aging roofs or poorly sealed laps. Check rakes, ridges, and areas around skylights and pipe boots after high winds.
- Roof snow load: Heavy, wet snow adds significant weight that can bow rafters or deflect trusses. Uneven snow drifting increases point loads. If you notice creaking or interior cracks, evacuate and seek professional help.
- Thermal shock: Rapid temperature swings, common during midwinter warm-ups, flex asphalt, metal flashings, and single-ply membranes. Inspect seams, fastener plates, and perimeter edge metal for movement or gapping.
Authoritative resources such as the IBHS guide to preventing ice dams and the FEMA Snow Load Safety Guide offer practical mitigation steps and inspection priorities.
Regional Considerations for Winter Roof Damage
- Northeast: Frequent nor’easters drive wind-driven snow that forms severe ice dams along eaves and valleys. Verify eave protection, attic ventilation in winter, and chimney flashing.
- Upper Midwest: Deep freeze conditions increase freeze-thaw cycles and brittle shingles. Look for nail pops, lifted tabs, and attic frost.
- Mountain West: High elevation snow loads and rapid sun-thaw on south slopes stress trusses and cause slush refreeze at shaded eaves.
- Pacific Northwest: Wet, heavy snow and wind-driven rain overwhelm gutters and downspouts and exploit roof flashing failure at sidewalls.
Detailed Signs to Look For After a Winter Storm
1) Leaks and Water Intrusion
- Ceiling stains: Fresh yellow-brown rings on ceilings or upper walls signal water pathways through the roof system.
- Attic clues: Inspect for damp sheathing, darkened wood, wet insulation, and rust on nail tips.
- Odors and mold: Musty smells often trace to hidden moisture near chimneys, valleys, and bath fan penetrations.
Case example: After a blizzard followed by a thaw, an ice dam forced meltwater beneath shingles. The homeowner noticed attic staining and damp insulation near the eaves. A contractor installed additional eave ice and water shield 24 inches inside the warm wall, improved air sealing at the attic hatch and recessed lights, added soffit baffles, and rebalanced ventilation. The result: no further leaks during the next storm.
2) Ice Dams and Icicles
- Ice ridges at eaves: A visible lip of ice or large icicles indicate refreezing at the roof edge.
- Backed-up water: Stained soffits or fascia suggest water migrating behind the gutter line.
- Edge deterioration: Lifted shingles and water marks at eaves point to recurring ice dam roof leaks.
Safe mitigation steps: Use a roof rake from the ground to pull snow down the slope. Create calcium chloride socks to form melt channels through ice, placing them perpendicular to the eave. Do not use rock salt, which corrodes metals and plants, and never chip ice with tools that could damage shingles.
3) Shingle and Surface Damage (Asphalt, Wood, Metal)
- Cracks, splits, and missing tabs: Focus on rakes, ridges, and windward slopes where uplift is strongest.
- Curled or cupped shingles: Cold embrittlement and age deform asphalt tabs and reduce sealing.
- Granule loss: Confirm whether gutters and downspout outlets show excess granules, which reduce UV protection.
- Nail pops: Exposed or backed-out fasteners create direct pathways for meltwater.
Distinguishing damage: Hail bruising feels soft with localized granule loss that exposes asphalt, while blistering presents as raised bumps from heat or ventilation issues rather than impact.
4) Flashing, Chimneys, Skylights, and Penetrations
- Lifted or gapped flashing: Freeze-thaw and wind-driven snow break seals at transitions.
- Brittle sealant: Cracked caulks around skylights and vents often fail in extreme cold.
- Chimney masonry: Spalling brick, missing mortar, or rust trails indicate water movement.
Mini checklist: Inspect step flashing in sidewall transitions, confirm counterflashing at chimneys is embedded and sealed, and verify that plumbing vent boots are not cracked or UV-brittle.
5) Gutters, Downspouts, and Edges
- Detached or bent gutters: Ice weight and sliding snow pull fasteners from fascia boards.
- Frozen downspouts: Ice clogs trap water that backs up under shingles and drip edge.
- Drainage path: Ensure downspout terminations discharge 4-6 feet away from the foundation and that splash blocks are positioned to reduce refreeze near eaves.
6) Structural Stress and Sagging
- Sagging ridgelines or bouncy decking: Heavy, wet roof snow load can overstress rafters and trusses.
- Interior shifts: New wall cracks or sticky doors can indicate load-related movement.
If you hear popping or creaking or see noticeable deflection after heavy snow, evacuate and call a professional immediately. Review the FEMA Snow Load Safety Guide for warning signs and safe removal practices.
7) Ventilation and Insulation Red Flags
- Frost on nails or sheathing: Inadequate attic ventilation in winter allows moisture to condense and freeze on cold surfaces.
- Damp or compressed insulation: Wet insulation loses R-value and fosters mold growth.
- Energy spikes: Unusually high heating bills often correlate with air leaks and poor insulation.
8) Hail or Sleet Impacts
- Dents in soft metals: Inspect ridge vents, gutters, and flashing for dimples that indicate hail activity.
- Shingle bruising: Look for dark spots where granules are knocked away, exposing asphalt.
9) Flat and Low-Slope Roof Warning Signs (EPDM, TPO, Modified Bitumen)
- Ponding water or ice sheets: Poor drainage accelerates membrane aging and seam failure.
- Open seams or loose laps: Freeze-thaw and wind uplift compromise adhesives and welds.
- Perimeter edge metal: Damaged coping and edge details are vulnerable during high winds and ice buildup.
Red Flags That Need Immediate Attention: Active dripping inside living spaces, rapidly spreading ceiling stains, visible roof or ridge sagging, large open seams on flat roofs, and ice dams backing up under shingles.
Tools to Have on Hand for Post-Storm Roof Checks
- Binoculars for safe ground-based roof scanning
- Flashlight or headlamp for attic inspections
- Moisture meter for spot-checking damp materials
- Roof rake for snow removal from the ground
- Camera or phone for time-stamped documentation
- Personal protective equipment (gloves, safety glasses, traction footwear)
What to Do Next: A Simple, Safe Inspection Plan
- Inspect within 24-72 hours when safe: Start indoors, then complete a ground-level exterior scan with binoculars. Avoid walking on snow- or ice-covered roofs.
- Document conditions: Photograph stains, frost, ice dams, and exterior issues. Note dates, temperatures, and precipitation types.
- Protect interiors: Place buckets under drips, move valuables, and run dehumidifiers or fans as needed.
- Check gutters and downspouts: Confirm attachments, clear visible ice when safe, and identify granule buildup at discharge points.
- Evaluate snow load: If you suspect structural stress, evacuate and call a professional. Do not attempt roof shoveling without training and fall protection.
- Call a contractor within 48 hours if leaks are present: Request emergency roof tarping to limit damage if water is entering.
- Keep materials for the adjuster: Save removed damaged shingles or sections and request photos from the contractor for your file.
- Follow through: Obtain a written inspection report with photos, a scope of work, and repair options.
When to Call a Professional Roofing Contractor
Contact a pro promptly if you observe active leaks, widening ceiling stains, sagging rooflines, large ice dams, widespread shingle loss, or ponding water and open seams on a low-slope roof. For selection, prioritize local, licensed, and insured contractors with manufacturer certifications and winter storm experience. Request a written scope, itemized estimate, timelines, and warranty terms.
Insurance and Documentation Tips
- Report quickly: Many policies require prompt notice after a storm for a storm damage insurance claim.
- Ask about coverage: Confirm if Ordinance or Law (code upgrade) coverage applies, clarify wind/hail deductibles, and verify whether ice dam water intrusion is a covered peril.
- Build a claim journal: Track dates, times, contacts, action items, and expenses. Keep receipts for mitigation and emergency roof tarping.
- Document the weather event: Note the storm name/date and attach a NOAA report or advisory relevant to your area.
- Get a detailed inspection report: Include cause of loss, affected areas, recommended repairs, and code-required upgrades with supporting photos.
Prevention and Winterization Checklist
Preventing cold-weather roof damage is more cost-effective than repairing it. Use these steps before and during winter, and for both homes and commercial buildings.
- Air sealing priorities: Seal attic hatches, recessed lights, bath fan penetrations, top-plate gaps, and plumbing/electrical penetrations. Install baffles at soffits to keep insulation from blocking intake vents.
- Attic insulation: Target recommended R-values for your climate zone and replace damp insulation to restore performance.
- Balanced ventilation: Provide intake at soffits and exhaust at ridge or roof vents to stabilize attic temperatures and reduce moisture.
- Eave protection: In snow-prone climates, extend ice and water shield at least 24 inches inside the warm wall per common code practice and manufacturer guidance.
- Gutter maintenance: Clean gutters before storms and confirm downspouts discharge 4-6 feet from the foundation.
- Flashing tune-up: Reseal brittle caulks, secure step flashing, and verify chimney counterflashing is intact.
- Material choices: Consider Class 4 impact-rated shingles, enhanced eave protection, and high-wind-rated accessories in severe-weather regions.
- Commercial flat roof winter damage prevention: Clear primary and secondary drains, verify scupper overflow function, check pitch pockets and penetration seals, and document seam weld quality on TPO/PVC.
- Heat tracing: Where appropriate, install and test heat cables on gutters and downspouts with GFCI protection and schedule periodic testing.
- Safe snow management: Hire trained crews for roof snow removal to avoid punctures and uneven loading. Follow federal and local safety guidance.
For deeper guidance, consult the U.S. Department of Energy guide to insulation and air sealing.
An Easy Analogy
Think of your roof like a winter jacket for your home. If the zipper (flashing) is loose, the seams (shingle laps) are worn, or the lining (insulation) is damp, cold and moisture sneak right in. Extend the jacket check: replace worn zippers (flashing), reproof the fabric (underlayment and eave protection), and restore insulation loft by drying or replacing wet insulation.
Future Outlook: Winter Weather Trends and Roofing Readiness
Across much of the United States, winter weather is becoming more erratic, with rapid warm-ups after deep freezes, heavier lake-effect snow, and storms that mix rain, sleet, and wind before temperatures plunge again. That volatility increases freeze-thaw cycles, elevates ice-dam risk, and stresses both steep-slope and low-slope systems.
Going forward, expect more rapid thaw-freeze cycles that challenge eave details and flashing. Building owners should budget for preventive upgrades such as enhanced eave protection, improved ventilation, and impact-rated materials, and consider data-driven monitoring (drones, infrared scans, moisture sensors). For climate context, see the NOAA National Centers for Environmental Information (NCEI) for temperature and snowfall trends.
FAQs: Cold-Weather Roof Damage
How soon should I inspect the roof after a winter storm?
Within 24-72 hours, once it is safe. Start inside, then complete a ground-level exterior scan. Schedule a professional inspection if you see leaks, sagging, large ice dams, or significant shingle loss.
Can ice dams really cause roof leaks?
Yes. Ice dams push water beneath shingles into the roof deck and attic. Prevention includes air sealing, insulation upgrades, ventilation balancing, and robust eave protection. See the IBHS guide to preventing ice dams for details.
Are flat or commercial roofs at higher risk in winter?
They can be, especially with marginal drainage. Ponding water, open seams, and heavy snow can overwhelm membranes. Regular drain cleaning, perimeter edge inspection, and pre- and post-storm checks are essential.
Will homeowner’s insurance cover winter roof damage?
Coverage varies by policy and state. Wind and hail are commonly covered perils; ice dam water intrusion may be covered, but maintenance neglect is often excluded. Document conditions, notify your insurer promptly, and obtain a professional inspection report.
Should I install heat cables to stop ice dams?
Heat cables can create melt pathways but do not fix root causes. Use them as a supplement to air sealing, insulation, ventilation, and eave protection.
How do I tell hail damage from blistering on shingles?
Hail bruises feel soft under finger pressure and show granule loss exposing asphalt. Blistering appears as raised, bubble-like bumps caused by heat or ventilation issues rather than impact.
Can ice dams form on metal roofs?
Yes. Although metal sheds snow better, ice can still form at cold eaves and valleys. Good air sealing, ventilation, and eave protection remain important.
Is a drone inspection worth it after a storm?
Often. Drones capture roof conditions safely when surfaces are slick. Ensure the operator follows FAA rules and that imagery is high-resolution with close-ups of eaves, valleys, and penetrations.
Do heat cables increase energy use significantly?
They add consumption while running. Use thermostatic controls and timers, limit use to high-risk eaves and gutters, and prioritize building envelope fixes for better efficiency.
What temperature range is safe for roof inspections?
There is no universal threshold, but avoid roof access during active ice, snow, or high winds. Many contractors prefer dry conditions above freezing for non-emergency work and will use fall protection in all cases.
What are common causes of roof flashing failure?
Thermal movement, improper installation, aged sealants, and debris or ice pressure. Focus on step flashing at sidewalls and counterflashing at chimneys.
How do I prepare for a post-storm roof inspection?
Gather photos, note leak locations, clear access to the attic, and list dates and weather conditions. Share any prior repair records.
DIY vs. Pro Repairs
- DIY tasks: Ground-based roof raking, interior monitoring, documentation, and basic gutter clearing at ground level.
- Pro-only tasks: Tarping, roof ice removal, structural assessment, membrane seam repair, flashing replacement, and any work requiring roof access.
Estimated Costs and Timelines
Minor shingle or flashing touch-ups are typically lower cost and can often be scheduled within the same week in normal demand periods. Larger scope repairs, including section replacements, chimney flashing rebuilds, or flat-roof seam and edge-metal work, are moderate and may require parts lead times. Structural reinforcement, extensive membrane replacement, or code-driven upgrades tend to be higher cost, may require permits, and can span multiple weeks, particularly during peak storm seasons.
Accessibility and UX Notes
- Use descriptive subheads and meaningful anchor text for links.
- Keep lists to 8-10 items for easy scanning and mobile readability.
- Target sentence length under 20-25 words where possible.
- Verify alt text and captions if images or diagrams are added later, reinforcing target keywords without stuffing.
Key Takeaway
The most common winter roof damage signs appear quickly: ceiling stains, ice dams, shingle or flashing issues, gutter failures, attic frost, and structural sag. Act fast with a safe inspection, documentation, and professional support to prevent small problems from becoming expensive repairs. Schedule a post-storm inspection and document findings for insurance.