How Humidity Affects Your Home’s Siding and What You Can Do About It
Humidity is simply the amount of water vapor in the air. When that moist air touches cooler exterior cladding, the vapor can condense and soak into the building envelope. Over time, this leads to warping, mold, paint failure, and hidden rot—especially at roof-to-wall intersections and around windows. In this guide, you’ll learn how humidity affects siding, what causes moisture intrusion and the exact phenomenon of condensation behind siding, how the dew point triggers problems, and the siding maintenance steps and roof-to-siding fixes that prevent long-term damage.
Quick answer: How humidity affects siding: warm, moist air drives vapor and rain into small gaps, causing swelling, mold, and paint failure. To reduce humidity damage to siding and prevent siding moisture damage, ensure kickout flashing, clear gutters, balanced attic ventilation, a continuous WRB (weather-resistive barrier), and a ventilated rainscreen for reliable drainage and drying.
Contents
- Why Humidity Is Hard on Siding
- Roofing–Siding Interactions (with Case Study)
- Featured Snippet: Quick Fixes and Long-Term Improvements
- How to Measure and Monitor Humidity (Indoors and Outdoors)
- Material-Specific Humidity Risks and Remedies
- The Science in Brief: Humidity, Dew Point, and Drying
- Moisture Testing and Diagnostics
- Best Practices: Installation and Maintenance
- Climate-Savvy Choices Across the U.S.
- Costs, Warranties, and Insurance Notes
- Future Outlook: Rising Humidity and Building Standards
- FAQ
- Internal Links
- Schedule a Moisture Inspection
- Glossary
- Sources
- Author & Disclaimer
- Editor Notes (Meta + Schema)
- Key Takeaways
Why Humidity Is Hard on Siding
Humidity, wind-driven rain, and temperature swings push moisture into seams, nail holes, and laps. Without a drainage path, that water lingers behind siding, wetting sheathing and trim. Paint blisters, boards swell, and mold forms where airflow is weakest. The biggest culprits: poor roof water control, missing kickout flashing, interrupted WRB (weather-resistive barrier), and no rainscreen gap for drying—conditions that increase the risk of condensation behind siding.
- Capillary action: Water wicks into tight joints and unsealed edges.
- Expansion and contraction: Wood-based claddings swell when wet, then shrink, stressing fasteners and finishes.
- Heat + humidity: Sun drives vapor deeper into assemblies; poor ventilation traps it.
- Mold and decay risk: Persistent dampness behind siding can fuel mold and rot, affecting durability and indoor air quality (EPA guidance on mold and moisture).
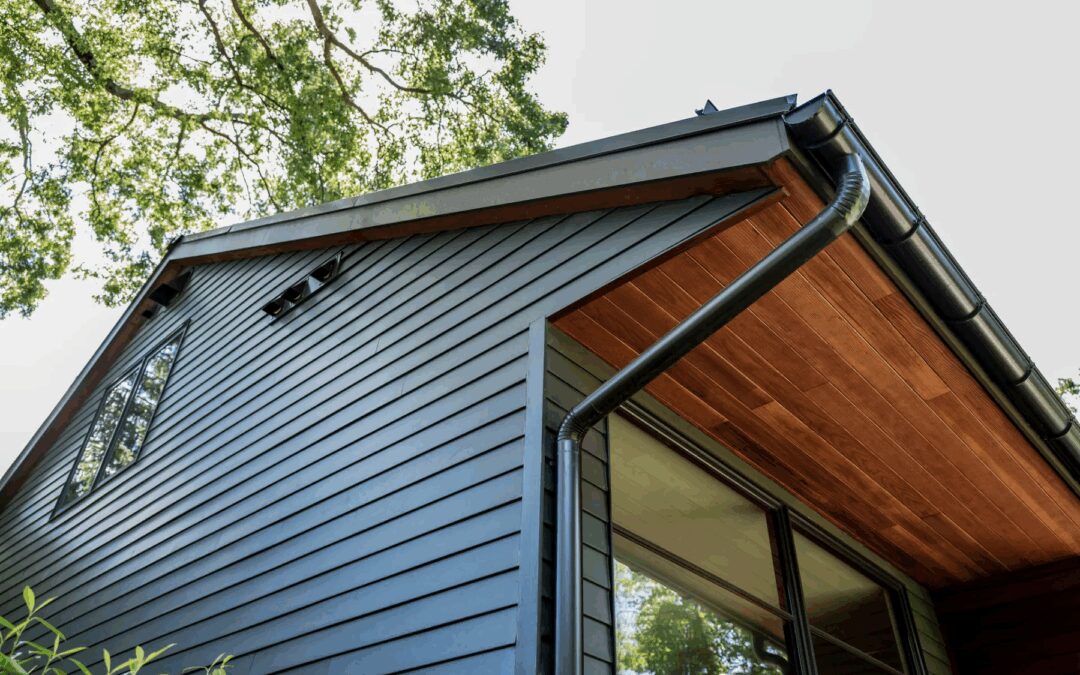
Roofing–Siding Interactions: Where Problems Start (and a Case Study)
Most humidity-related siding failures begin at the roof edge. Concentrated roof runoff, poorly aligned drip edge, or missing kickout flashing allows water to bypass the siding and soak the wall. Proper integration between roof details and the wall’s WRB is non-negotiable.
- Gutters and downspouts: Clean, right-size, and slope them correctly to avoid overflow onto exterior cladding.
- Kickout flashing: This small diverter at roof-to-wall junctions sends water into the gutter instead of behind the siding.
- Drip edge alignment: Direct runoff into gutters, not behind fascia or onto siding.
- Attic ventilation: Balanced soffit intake and ridge exhaust reduces attic humidity that can condense on sheathing behind siding.
Mini Case Study: Missing Kickout Flashing on Stucco Wall
Location and climate: Coastal home, Climate Zone 3A. Prevailing onshore winds created frequent wind-driven rain events.
Year: 2023.
Symptoms: Brown staining and hairline cracking at the base of a stucco return beneath a short roof eave; musty odor indoors after heavy rain.
Findings: No kickout flashing. Moisture readings 24–28% MC at OSB sheathing near the roof-to-wall intersection. Deteriorated WRB and localized rot behind lath.
Fix: Install formed kickout flashing; remove damaged stucco; replace compromised sheathing; install new WRB integrated with step flashing; add a 3/8-inch rainscreen drainage mat; re-clad and seal penetrations.
Prevention: Inspect all roof-wall intersections; verify kickout at every eave return; maintain gutters; preserve a continuous WRB with shingle-lapped flashings; schedule annual siding maintenance walkthroughs.
Featured Snippet: Quick Fixes and Long-Term Improvements
The following quick fixes are optimized for a featured snippet and provide immediate relief while you plan durable upgrades.
Immediate Steps (under 65 words)
- Clean gutters; extend downspouts 4–6 ft.
- Add kickout flashing at roof-wall joints.
- Seal penetrations with exterior-grade caulk.
- Trim vegetation 12–24 in. from siding.
- Target 30–50% indoor RH with fans.
- Confirm WRB intact during repairs.
Long-Term Improvements
- Install a ventilated rainscreen (3/8–3/4 in.).
- Balance attic ventilation (soffit + ridge).
- Upgrade flashings (step, head, kickout).
- Repaint over dry, properly primed substrate.
- Choose climate-appropriate siding and fasteners.
- Document maintenance for warranty and insurance.
How to Measure and Monitor Humidity (Indoors and Outdoors)
- Hygrometers: Place digital hygrometers on each level of your home. Keep indoor relative humidity at 30–50%, per the EPA guide to indoor humidity.
- Pinless moisture meter: Scan siding and interior walls near roof-to-wall intersections and window trim. Map any readings trending high to spot condensation behind siding and moisture intrusion paths.
- Infrared thermometer: Identify cold surfaces that could fall below the dew point during humid conditions. Pay attention to shaded north walls, soffits, and around penetrations.
- Weather monitoring: Track outdoor dew points via local forecasts. Very high dew points increase vapor drive toward the exterior in summer (NOAA Climate.gov on dew points).
Material-Specific Humidity Risks and Remedies
- Wood siding and trim: Highly hygroscopic; prone to swelling, cupping, and paint failure. Use back-primed boards, a rainscreen, and stainless or hot-dip galvanized fasteners. Maintain 6–8 inches above grade and 1–2 inches above hardscapes; prefer ring-shank stainless nails for best hold in humidity.
- Engineered wood: Sensitive edges can swell if not sealed. Edge-seal cuts and maintain WRB continuity. Keep 8 inches off soil and 1–2 inches off hard surfaces; use hot-dip galvanized or stainless fasteners per manufacturer specs.
- Vinyl siding: Sheds water but can trap it behind without a drainage gap. Ensure WRB and weeps. Maintain 6–8 inches from grade and 1–2 inches from hardscapes; nail for expansion with stainless or hot-dip galvanized nails into studs.
- Fiber cement: Dimensionally stable; excels with a ventilated rainscreen. Maintain 6–8 inches clearance to grade and 2 inches to rooftops/hardscapes; use corrosion-resistant, stainless or hot-dip galvanized ring-shank nails.
- Stucco/EIFS: Requires drainage and kickout flashing; without them, sheathing rot can be severe. Keep 6–8 inches above soil and 2 inches above paved surfaces; use proper lath, WRB layers, and stainless or hot-dip galvanized fasteners.
- Metal siding: Resists vapor but can sweat on the back side; isolate from dissimilar metals. Maintain 6–8 inches above grade and 1–2 inches above hardscapes; use coated, ZAM-coated, or stainless fasteners to limit corrosion, especially in coastal air.
Compare Siding Options in High Humidity (Pros and Cons)
- Vinyl: Pros: low maintenance, won’t rot. Cons: can trap moisture; wind uplift risk without proper nailing and WRB.
- Fiber cement: Pros: stable, resists pests and fire. Cons: needs careful flashing and paint maintenance.
- Wood: Pros: natural look, repairable. Cons: higher maintenance; paint/rot risk without rainscreen.
- Engineered wood: Pros: lighter than fiber cement, uniform boards. Cons: edge swelling if unsealed; needs strict clearances.
- Metal: Pros: durable, recyclable. Cons: potential condensation and corrosion in salty air.
- Stucco/EIFS: Pros: seamless look, energy benefits (EIFS). Cons: severe damage if drainage paths or kickout flashing are missing.
The Science in Brief: Humidity, Dew Point, and Drying
Moist air seeks colder surfaces. When a surface temperature drops below the dew point, vapor becomes liquid water. That water often forms on the back of siding or the face of sheathing. If the assembly can’t drain and dry, damage accumulates and you get condensation behind siding.
Dew point in one sentence: It’s the temperature at which air becomes saturated and water vapor condenses into liquid.
Example: On a shaded north wall in summer, outdoor air with a high dew point can cool on the sheathing enough to cause condensation behind siding, wetting the wall until sun or airflow dries it.
In hot-humid and mixed-humid climates, summertime drying often wants to move outward. A ventilated rainscreen creates a capillary break and airflow path to accelerate drying (Building Science Corporation on rainscreens).
Moisture Testing and Diagnostics
- Visual inspection: Look for peeling paint, algae, warped boards, and staining at roof returns.
- Moisture meter mapping: Use pinless scans to map elevated areas, then confirm with pin probes where safe. Wood sheathing at or below ~12–15% MC is typical; readings ≥20% require investigation, drying, and often selective removal.
- Flashing integration check: Verify step and head flashings are shingle-lapped with the WRB and that kickouts are present.
- Attic inspection: Look for rusty fasteners, damp insulation, and sheathing discoloration that signal condensation.
- Targeted removal: If readings exceed safe levels, remove a small siding section for probe testing at sheathing and to inspect WRB continuity.
- Trend analysis: Re-check moisture content at the same locations over 24–48 hours. Rising numbers indicate active wetting; falling numbers indicate drying. Aim for stabilization below ~15% MC.
Document readings with timestamps and photos to track changes and support warranty or insurance claims.
Best Practices: Installation and Maintenance
Prioritize siding maintenance alongside roof water control to keep assemblies dry.
Roof Water Management
- Clean and right-size gutters for local rainfall; add downspout extensions and splash blocks.
- Verify drip edge alignment to direct water into the gutter, not behind fascia.
- Install kickout flashing at every roof-to-wall intersection.
Ventilation and Indoor Humidity Control
- Balance attic ventilation with continuous soffit intake and ridge exhaust (follow manufacturer and code guidance).
- Vent bath and kitchen fans to the exterior; avoid venting into the attic (DOE Energy Saver: Home Ventilation).
- Use dehumidifiers in basements and crawlspaces to keep indoor RH at 30–50% (EPA humidity guidance).
Indoor Source Control
- Vent dryers outdoors with rigid ducting; clean lint and check backdraft dampers.
- Run bath/kitchen exhaust fans during and 20 minutes after use.
- Seal air leaks at top plates, can lights, and attic hatches to reduce vapor drive into walls and ceilings.
Walls That Drain and Dry
- Install a continuous WRB behind all cladding with properly lapped window and door flashings.
- Create a rainscreen cavity (3/8–3/4 inch) with furring or a drainage mat to provide a capillary break and airflow. Some jurisdictions require a minimum 10 mm (~3/8 inch) rainscreen by code.
- Leave open weeps at the base of cladding to allow drainage.
Flashing and Sealants
- Integrate step flashing with shingles and the WRB; add kickout flashing at the base of roof returns.
- Use high-quality, paintable sealants; don’t seal designed weep paths.
- Back-prime wood and cut ends; edge-seal engineered wood per manufacturer.
Ground and Landscape Management
- Maintain 6–8 inches clearance between siding and soil; 1–2 inches above hardscapes.
- Regrade soil away from the foundation; add drains if needed.
- Redirect sprinklers so they don’t wet siding or soffits.
Maintenance Schedule
- Spring: Clean gutters; add downspout extensions; inspect kickout flashing; perform siding maintenance for caulk and paint.
- Summer: Trim vegetation 12–24 inches from siding; wash gently to remove algae; do a post-storm inspection after heavy rain or wind.
- Fall: Re-caulk joints; touch up paint over dry, prepped surfaces; perform a quarterly visual check of roof-to-wall intersections.
- Winter: Check attic ventilation and look for frost or condensation on nails and sheathing; schedule siding maintenance to spot early issues.
Power Washing and Cleaning
- Use low pressure (under ~1,500 PSI) and a wide fan tip; keep the nozzle at least 12 inches from the surface.
- Spray downward with the laps, not upward, to avoid forcing water behind siding.
- On pre-1978 homes, avoid disturbing potential lead-based paint; consider professional testing and lead-safe practices.
- Use oxygenated bleach or siding-safe cleaners as alternatives to harsh chlorine solutions; rinse thoroughly to protect finishes and landscaping.
Climate-Savvy Choices Across the U.S.
Hot-humid (Gulf Coast, Southeast): Daily high dew points load walls with moisture. Prevailing southerly winds often drive rain into west and south exposures. Prioritize corrosion-resistant stainless or ZAM-coated fasteners, wide overhangs, ventilated rainscreens, and balanced attic ventilation. Consider fiber cement or vinyl installed over a drainage plane. Coastal salt exposure accelerates corrosion—use stainless where feasible (NOAA on humidity trends).
Mixed-humid (Mid-Atlantic, Midwest): Drying direction flips seasonally. Rainscreen assemblies and meticulous flashing (especially kickouts and head flashings) help both in summer vapor drive and winter condensation risk. Prevailing westerlies can produce wind-driven rain; protect west and south walls with robust details.
Marine (Pacific Northwest): Persistent rain and onshore winds demand robust WRBs, generous drainage gaps, and stainless or ZAM-coated fasteners. Back-primed wood or fiber cement over a rainscreen performs well. Design for frequent wetting, slow drying, and wind-driven rain at corners and roof returns.
Cold and very cold (Upper Midwest, Northeast, Rockies): Interior moisture drives outward in winter. Air seal interiors, use mechanical ventilation (ERV/HRV), and include exterior drainage and drying paths for spring and summer. Northerly winds can push snow and rain against north and east walls—watch for ice dams at roof-to-wall junctions.
Arid/High desert (Interior West, Southwest): Low ambient RH but intense UV and thermal swings stress sealants and paint. Sudden monsoon downpours with shifting winds require excellent roof-to-wall flashing and kickouts to control splashback and bulk water.
Costs, Warranties, and Insurance Notes
- Warranties: Many siding warranties exclude damage from improper flashing or high humidity. Keep dated photo documentation and invoices of maintenance and flashing work to support any claims.
- Insurance: Policies may not cover gradual moisture intrusion. Documentation of inspections and prompt mitigation strengthens claims.
- Budgeting: Small upgrades (kickouts, downspout extensions) are low-cost; rainscreens and re-siding are higher upfront but reduce repaint cycles and rot risk.
- Standards: Following recognized guidance (e.g., IBHS moisture and roofing resources) supports code compliance and quality control.
Future Outlook: Rising Humidity and Building Standards
Warmer air holds more moisture. Many regions are already seeing higher dew points and more intense rain events, raising the moisture load on roofs and walls. Expect more emphasis on continuous WRBs, ventilated rainscreens, and better roof-to-wall integration to manage bulk water and vapor (NOAA Climate.gov on humidity and heat).
Building science research continues to show that even a small air gap behind cladding dramatically improves drying. As a result, more U.S. codes and manufacturer instructions are likely to require or strongly recommend rainscreen assemblies, especially in wet and mixed-humid zones (Building Science Corporation: Mind the Gap).
FAQ
What is the ideal indoor relative humidity (RH)?
Aim for 30–50% RH to reduce condensation risk and mold growth, per the EPA’s humidity guidance.
Can vinyl siding trap moisture?
Yes. Vinyl sheds rain, but without a WRB and drainage gap, water can collect behind panels and wet the sheathing.
What is a rainscreen?
A ventilated gap (typically 3/8–3/4 inch) between siding and WRB that creates a capillary break and airflow for drainage and faster drying.
How do I know if I need kickout flashing?
If your roof terminates into a wall and you see staining, peeling paint, or rot below that junction—or your gutters overflow there—you need kickout flashing.
Do dehumidifiers fix exterior moisture issues?
They help control indoor RH but do not solve exterior drainage or flashing failures. You need proper roof water management, WRB continuity, and a rainscreen.
Can pressure washing void my siding warranty?
It can if used improperly. Many manufacturers limit pressure and spray direction; forcing water behind laps can cause damage. Check your warranty and instructions.
How often should I repaint in humid climates?
Typically every 5–7 years for painted wood or fiber cement, assuming proper prep, primer, and a sound substrate. Trapped moisture shortens repaint cycles.
Internal Links
- Guide to gutter sizing by roof area and rainfall intensity
- Roof flashing basics: kickout, step, and head flashing
- Attic ventilation design: balancing soffit and ridge vents
- How to choose siding for your climate zone
- See our service areas and book an inspection
Schedule a Moisture Inspection
Concerned about humidity, stains, or soft spots? Book a professional moisture inspection today. We’ll evaluate roof-to-wall details, WRB continuity, and ventilation, then provide a prioritized action plan. View our service areas or download a free moisture inspection checklist (PDF) to get started.
Glossary
- WRB (weather-resistive barrier): A water-shedding membrane behind siding that blocks liquid water while allowing vapor to diffuse; it’s the backbone of the wall’s drainage plane. Properly taped and lapped WRB integrates with flashings to protect sheathing from bulk water. Selecting vapor-open WRBs can also improve drying in mixed-humid climates.
- Rainscreen: A ventilated gap (often 3/8–3/4 inch) between siding and WRB that creates a capillary break and airflow, accelerating drainage and drying. It also helps equalize pressure during wind-driven rain to reduce water entry. Adding bug screens at vent openings preserves airflow while blocking pests.
- Kickout flashing: A small, angled flashing at the base of a roof-to-wall intersection that diverts water into the gutter and away from the wall. It prevents concentrated roof runoff from bypassing cladding and soaking sheathing. Properly formed kickouts should be rigid and extend beyond the wall plane to catch the water stream.
- Soffit: The underside of a roof overhang; vented soffits bring fresh air into the attic for balanced ventilation. Clean soffit vents improve intake airflow and cut condensation risk at the roof edge. Pairing soffit intake with ridge exhaust is critical for consistent air movement.
- Ridge vent: A continuous vent at the roof peak that exhausts warm, moist attic air to balance intake from soffits. Effective ridge vents lower attic humidity and reduce condensation on roof sheathing. Ensure the vent remains unobstructed by insulation or debris for best performance.
- Capillary action: The tendency of water to wick through tiny gaps and pores, which can draw moisture into joints and behind cladding. A rainscreen cavity and back-priming help break capillary pathways. Tight, well-detailed flashings and sealed end cuts further limit capillary uptake.
Sources
- EPA: A Brief Guide to Mold, Moisture, and Your Home
- Building Science Corporation: Mind the Gap, Eh! (Rainscreen Basics)
- NOAA Climate.gov: It’s not the heat, it’s the humidity
- Insurance Institute for Business & Home Safety (IBHS): Roofing and moisture resources
- U.S. DOE Energy Saver: Home Ventilation
Disclaimer: Always follow local building codes and manufacturer instructions. Site conditions vary; consult a licensed contractor for inspection and repair recommendations.
Key Takeaways
- Understand how humidity affects siding to prevent costly failures at roof-to-wall intersections.
- Kickout flashing, a continuous WRB, and a ventilated rainscreen prevent siding moisture damage.
- Balance soffit and ridge ventilation and keep indoor RH at 30–50% to limit condensation behind siding.
- Choose climate-appropriate materials and stainless or hot-dip galvanized fasteners to reduce corrosion and swelling in high humidity.
- Regular siding maintenance—gutters, caulking, gentle cleaning—extends finish life and helps avoid hidden rot.
Analogy: Your siding is like a breathable raincoat: it sheds water, but without a lining (WRB) and an air gap (rainscreen), sweat (humidity) gets trapped and soaks through.